The purpose of this page is to show you how to make
videos in RCT3 and how to show off your RCT3
reactions on YouTube.
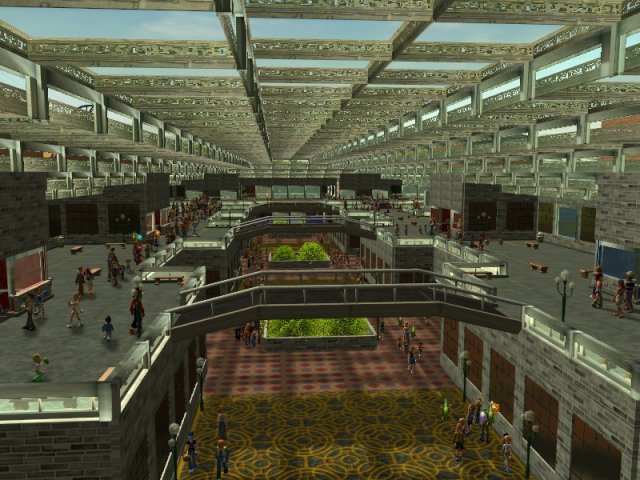
First of all, check your video settings
Normally when playing the game, you can't have the
quality settings up too high, as this would significantly slow down the
game, especially when you have a lot of scenery on screen. When I am
building my parks, I usually like to have my quality settings set at the
default settings, this provides a good balance between image quality and
performance.
However, when filming videos, it
makes a lot more sense to have the settings set much
higher, as although video recording does take
a while, the video will always be smooth, no mater
how graphic intensive the result.
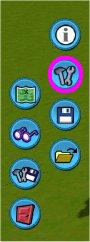 |
Where you usually load and save games in sandbox mode,
there are two other options, here I have highlighted the
"Game Options" button. Go here to check your settings before
you begin filming your videos. |
After that, you will need to go to
the "Graphics Settings" tab.
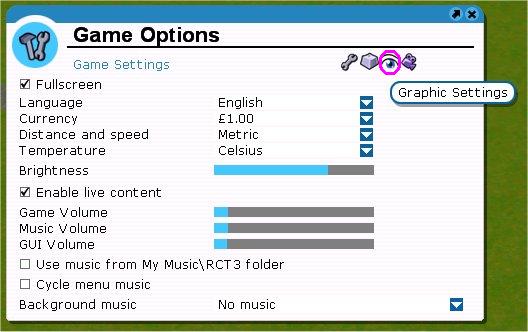
It is in here that you can adjust your graphics settings
for filming.
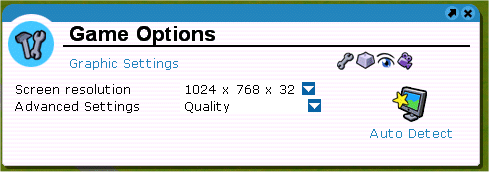
Here I have my screen resolution set to "1024 X 768 X
32" and my Advanced Settings set to "Quality" These are good modes for
building, but once you are ready to film, it is time to change these.
You will need to quit RCT3 to change
these, by editing the options.txt file.
Personally, I prefer to use a screen
resolution of 1280X720 for HD filming, unfortunately
RCT3 does not support this mode officially, but
there is a way around that.
Your monitor and graphics card will
have to support this resolution.
All you have to do is locate your
"options.txt" file, then edit it to display in this
resolution. In windows 7, your options.txt file can
be found in "your personal fonder ---> appdata -->
roaming --> atari --> rct3" You may need to adjust
your file display options to locate this file.
Simply open the file, and change the
resolution to 1280 X 720 as shown below:
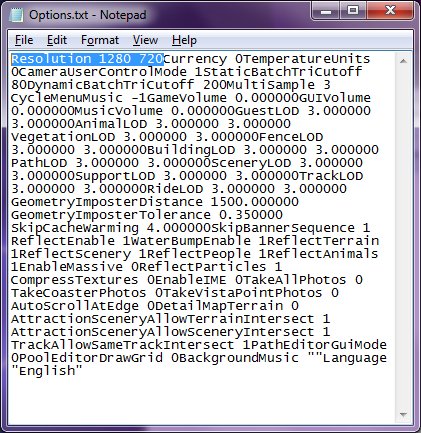
If you have done this successfully,
when you launch RCT3 again, it will be in the
1280X720 resolution.
You could also use "Full HD"
resolution (1920X1080) but I personally think that
1280 X 720 is more than enough for an RCT3 video.
Next, change the advanced settings to "Custom" you will
be provided with a whole new set of options, you simply have to put them
all to maximum.
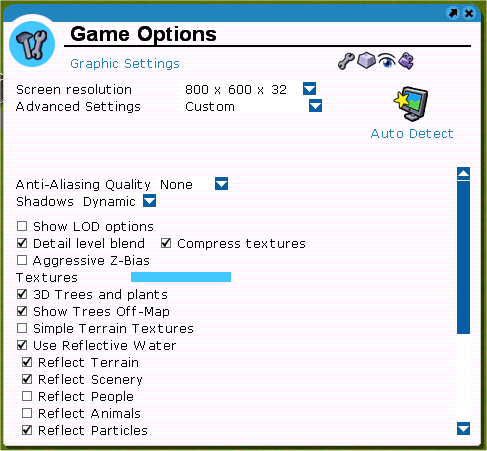
Shadows should be set to "Dynamic" and Anti-Aliasing can
be set to whatever you prefer, depending on the capabilities of your
graphics card. For filming for Youtube, Level 1 or 2 is usually best.
The Textures slider should also be at Maximum.
The following items should be checked:
Detail Level Blend
Compress Textures
3D Trees and plants
Show Trees Off Map
Use Reflective Water
(everything in this submenu should also be checked, reflect everything!)
Use Environment Map on flowing water
Clouds
Refraction
Background Mountains
The Following items should NOT be checked.
Simple Terrain Textures
Bloom
The bloom setting adds a "glow" to many parts of the
park. I find that the effect does not work that well, which is why I
recommend that it is not used.
The rest of the settings are probably best left as they
are.
Now, check the item "Show LOD options" and another panel
of options should appear:
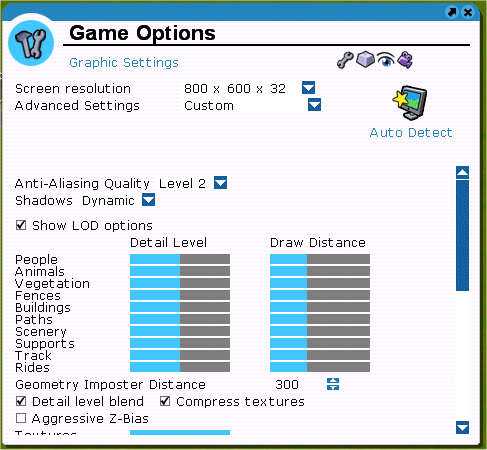
All you have to do here is go through each and every one
of the sliders, and put them to maximum. The Geometry Imposter Distance
should be set to 1500, the maximum setting.
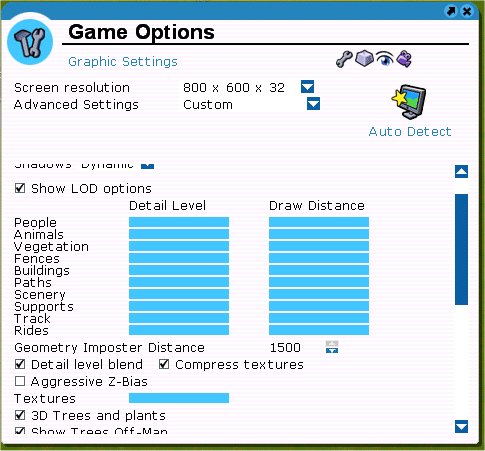
And there you have it, the optimum settings for
recording video. Simply close the window to continue.
The game may appear to run more slowly after you have
done this, but remember that the videos you produce will be just as
smooth as normal, but will have a lot more visible detail in them.
When you have finished filming, you will want to put the
settings back to the defaults, simply follow the steps as above, and set
the "Advanced Settings" back to "Quality" or whatever you prefer.
More Filming Tips
The flying camera routes editor is great, but it should
not be over used. It would be very easy to make a video that just shows
a flying camera moving from one part of the park to another, but it
would also show the space inbetween. Sometimes it is better to take a
"still shot" instead. Some people on Youtube take screen shots using
F10, and making video slide shows, but to make things more interesting
follow this method.
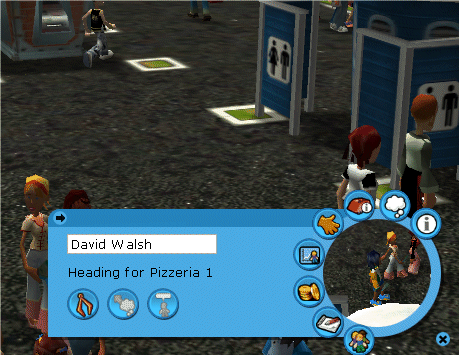
First of all, click on a peep, and change their name
to "David Walsh", this enables the games interface to be hidden. Try
pressing Ctrl-U to see if this works, if you have been successful,
the interface should disappear, leaving you with just a view of the
park. Press Ctrl-U again to bring it back.
Now, all you have to do is place your view where you
want the shot to be taken, and then press CTRL-U to make the
interface disappear, then press CTRL-SHIFT-F11 to start recording.
Let it record for a few minutes, and then press CTRL-SHIFT-F11
again, then CTRL-U. The result is a still shot of the video, but one
that still shows the peeps walking around, and the rides moving,
this looks much more interesting in a video than a still screenshot.
Another advantage that still shots have over the flying camera is
that Youtube videos tend to look better when there is not too much
movement, these are good for areas of your park that have lots of
detail in them that you want to show off. I typically have still
shots of about seven seconds each.
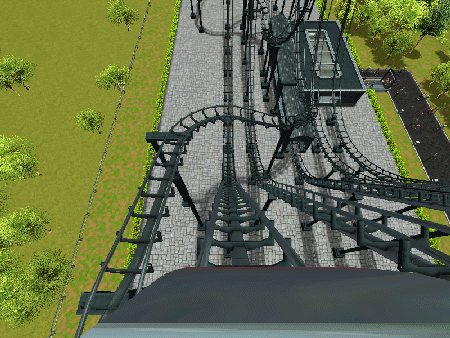
The Coaster Cam.
The coaster came is fantastic, it is what allows us to
experience our ride creations in ways that the previous Roller Coaster
Tycoon games could not. Filming your rides is quite easy. Simply use the
"David Walsh" method, and then enter the coaster cam. When the ride is
at the station and is about to leave, press CTRL-U and then
CTRL-SHIFT-F11 to begin recording. Once the recording process has begun,
you will not have to worry about the blue controls appearing, and
spoiling your video. When the ride has finished, simply press
CTRL-SHIFT-F11 and CTRL-U to end.
Uploading
Although I like to use Corel Videostudio to edit my videos, I use
Windows Live Movie Maker to do the uploading. The reason for this is
that Windows Live Movie Maker contains a built-in video uploader for
Youtube that tends to be much more reliable then the web interface that
Youtube uses, and it supports HD resolutions.
Simply import your video into Windows Live Movie Maker, then click the
Youtube icon, you will be able to select the appropriate resolution
here, then all you have to do is enter your Youtube user name and
password, and allow the program to upload your file. Please be patient,
as it will take some while!
|
